The Phoenix Table: this one arose from the scrap pile
My sister-in-law is moving into a new house after completing her PhD. Essentially she is starting from scratch and has no furniture. Fortunately she has a brother-in-law looking for an excuse to make something. With some urging from my wife and mother-in-law, I started on a quick project this weekend to give her some semblance of furniture. She loves to read and I thought that no bedroom would be complete without a bedside table to put your book and the dreaded alarm clock on. Her tastes are simple with a hint of asian.
Since Shaker and Asian design have so many parallels I thought I would blend them with a Shaker side table inspired by the Sabbathday Shaker community in Gray, Maine. My wife’s family has been vacationing in Maine for years and they even visited this community one year so it is even more appropriate. The asian blend will be mostly the finish and possibly the drawer pull. I will be painting the piece black and putting a few top coats on lacquer on it. I haven’t found the drawer pull yet, but I am envisioning a Chrsyanthemum motif. If nothing else I will try my hand at carving one if I can’t find a metallic equivalent.
The basic design is taken from a Woodworking magazine article by Chris Schwarz because of the ease of construction and the very little amount of stock required to build it. Since the final product will be painted I was thinking poplar. However all the poplar in my shop is already spoken for and milled. I only need about 12-15 board feet so I turned the to scrap pile of pine to see what I could find.

There was actually more than this floating around the shop too, but this pile would serve my needs and then some. For the long time readers of this blog, you will notice the pieces left over from my old countertop before I went to the laminate.
One of my favorite parts of a project is laying out the stock and figuring out where the individual pieces will come out of the rough stock. It is not so important here since the finished piece will be painted, but with so many holes and knots and such on this stock it took some planning to work around it. After some milling I got my pieces laid out for the joinery. Not pictured here are the 18″ square top and the drawer bottom, but it is shocking how little wood is needed to build this table.
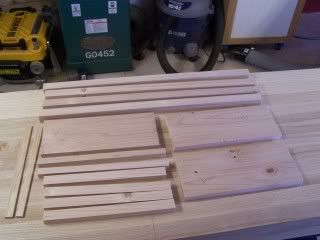
Check out the awesome bench underneath it all too!
I cut most of the mortise and tenon joinery on the router table this time. I really like how I can perfectly dial in a fit using my router lift. For the bottom rail just below the drawer, I chopped out the mortises using a chisel and sawed the tiny 5/8″ tenons by hand. Finally I tapered the legs using the bandsaw and cleaned up the cut with my jointer plane.
Time for a quick dry fit.
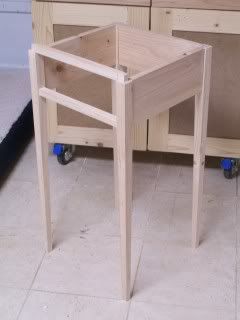
Here you can see the top rail merely fit into place. I cut 1/16″ shoulders on 3 sides of the rail on the router table and now I needed to dovetail it into the tops of the legs. My dovetailing is still very weak and I keep using my bench in progress as an excuse for not practicing. No excuses for this so I went to work cutting the tails first. This went well since they are so small and only a single tail on each end of the rail. I scribed the outline of the tails into the top of the leg and went to work with my chisel. Both joints fits snugly and strongly but one had a little more slop around the top edges. The other joint came out really snug. I took pictures and loaded them onto my external hard drive only to have it crash so I have no proof.
I beveled the bottom of the top board by marking a line 2 inches in on all four edges and then planed the bevel using my jack plane. From here I glued everything up and finished the assembly.
I took the measurements for the drawer and built a simple rabbetted drawer. (I told you my dovetailing is weak!). For reinforcement and a little style, I pegged the rabbet using walnut Miller dowells. I really like the look this gives to the piece and I had some left over from my last sushi box.
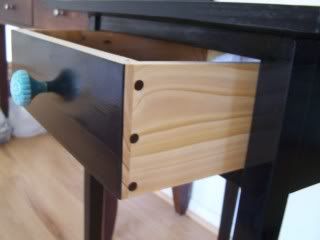
I used a block plane to finesse the fit. I did get some tearout at the swirly grain near the front edge so rather than temp fate, I went to the RO sander. This turned out to give me a great finish, but my lack of attention accidentally rounded the corner a little leaving me with a sloppy reveal. Since the drawer ended up being a little proud of the front, so I planed about 1/32 off the front and that killed a little of the bad reveal. Ultimately the black paint will disguise this reveal too so I wasn’t too worried. I’ll chock this one up to experience and be more careful next time.
Finally, I sprayed on a good quality black enamel paint. 2 coats gave me great coverage. After this was dry, I sprayed on several coats of lacquer until I was happy with the shine. I did apply a coat of Renaissance wax to the top to give it a slick feel.
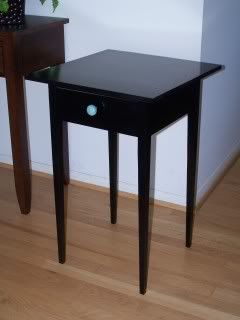
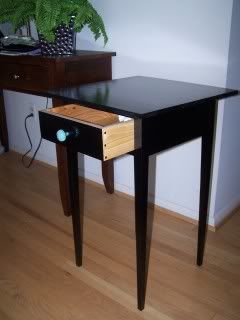
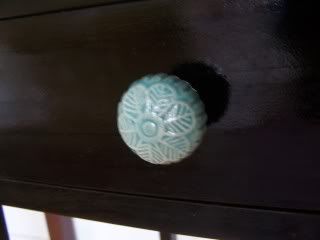
In the end, I chose an antique knob I found at a flea market that had the Chrysanthemum motif I was looking for. The blue color really popped against the black finish too.
This was a fun project that came together really fast. My sister-in-law is really happy with it and was really happy with the drawer joinery as well so I didn’t have to feel bad about chickening out on the half blind dovetails.
Hey, if nothing else this table beats the cardboard box she was using as a night table!
