Woodworking Without
I have a great deal of respect for 18th century carpenters who built wonderful things using just a few tools. Not only that but they worked out in the elements usually without a workbench and fancy vises. When you dig deeper you start to uncover some of the tips and tricks of the trade that have been devised over years of working without. Occasionally I’ll find a gem hidden in the pages of books like “The Village Carpenter”, “The Rural Carpenter”, or “The Wheelwright’s Shop” and it blows my mind with how such a simple thing can change the way you work.
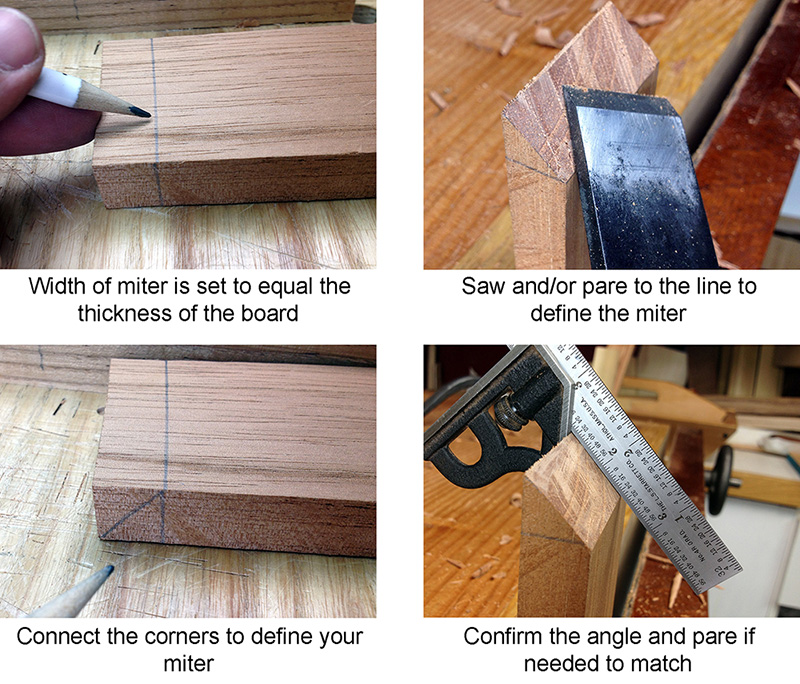 For example: if you take the thickness of a board and mark that on the length you have just laid out two points which when connected form a 45 degree angle. Step back and you will realize that all we are really doing is defining a square on the end of the board which when bisected from corner to corner will yield a 45 degree angle. Stupid simple right, but how many times have you reached for your bevel gauge or combo square to lay in that angle? You see when we have the tools we use them. There is nothing wrong with that, in fact I would much rather the tools get used than look pretty on a shelf or God forbid nailed to the wall of an Applebees.
But when we don’t have the tool in the first place improvisation happens and these brilliant shortcuts result. I have uncovered them by reading but I’m afraid that many are lost to the ages. Think about the simple things you do in your own shop that you never mention because you figure everybody already knows them. This is exactly how it happens and knowledge like this gets lost.
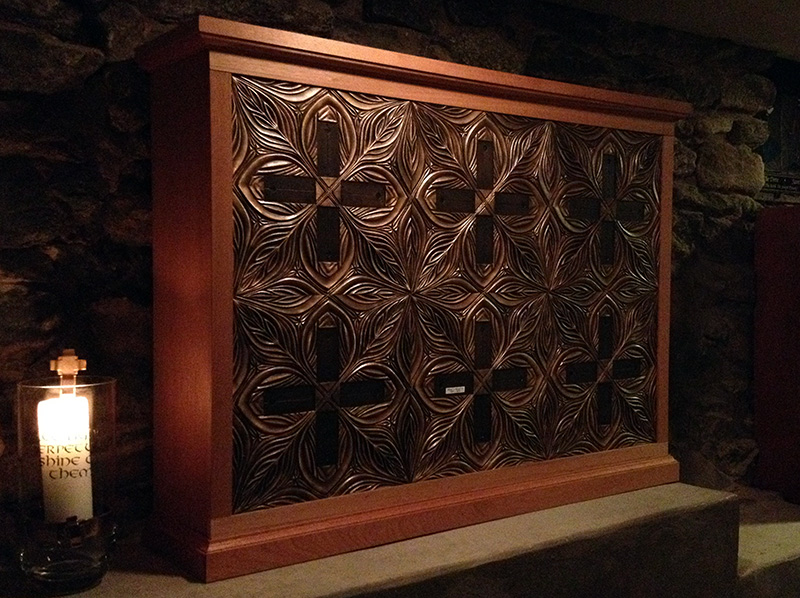 So I have been doing some field research recently and forcing myself to put away some tools and see what results. I have a commission to build cabinets around Columbarium at a church and I have done all the work on site in a dark space with very minimal tooling and work surface. Also in my volunteer work at the Steppingstone Museum I have taken to bringing only the tools I will use for the day in a small Underhill style tool tote. Slowly but surely I am picking up some of these techniques. The miter trick I mentiond above is all I used to layout and cut the miters for the mouldings that wrap this case. All of these were quickly laid out and pared to shape using just a chisel. The irony is that for one of the crown moulding runs I did use my miter box in my shop but discovered that the joints needed further tweaking with a chisel to fit just right around the case. I think I would have saved time by just laying out and cutting onsite instead.
The space is a blade eating, concrete jungle. I’m consciously aware of where I’m setting down my tools for fear of dinging up blades on this dusty and gritty surface. Even setting project parts down is dangerous as grit gets embedded in the wood which destroys plane blades later on. Because of this I found myself getting very creative with my work holding since I am working without a bench or vises.
It is amazing how your sawing technique changes and improves when you don’t rely on a leg or Moxon vise to hold the wood. The classic “butt vise” is incredibly effective for all kinds of cuts and when you force yourself to use it you become hyper aware of the forces that act on the board while sawing and how to counteract them. Suddenly you aren’t restraining the work piece any more but opposing the force of the saw. This may seem subtle but compare it to how you hold a saw. If you grip too tightly you force the saw to follow your own body mechanics which can be horribly wrong. If you use a light grip the saw is allowed to do what it does and it follows a line and cuts more efficiently.
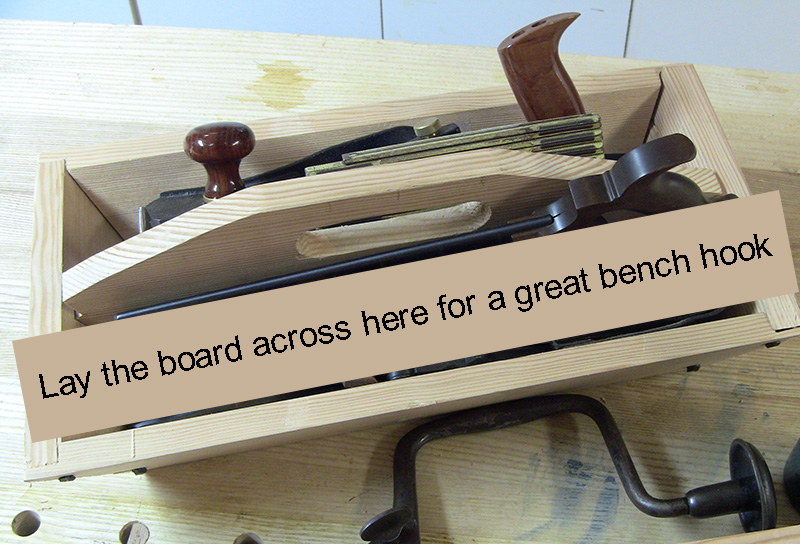 Next time you use a bench hook while sawing you can feel this opposition principle (sounds official doesn’t it) at work. In fact the handle of your tool tote serves as a great bench hook when you lay the board on top of the tote along the length. Hold the board against the hook using only your pinkie and begin sawing. You will feel every vibration and movement of the board. When the board jumps around generally you are fighting the saw and slight body adjustments will make it stop. If you restrain the board with a strong grip you can force the saw to cut off the line without knowing it.
This is the same thing going on with the opposition approach to work holding. You get more feedback on what is happening with the board and find that you can anticipate when a cut goes awry by the change in the force and correct it before the cut strays. I ripped and cross cut all the wood for this cabinet then cut all the tenons without a single vise to restrain the wood. At first I struggled a lot and the saw jammed as the wood moved around and threw my kerf out of alignment with my saw. Once I figured out that the board was telegraphing to my fingers or knee or thigh or whatever was holding it what was happening I was able to adjust and suddenly the saws just began to glide along. The low light of the space actually enhanced the reflection of the wood in the saw plate making it easier to judge square and plumb by watching it closely. Yet another age old trick borne out of necessity when the carpenter didn’t have a square to layout a line.
 The gritty surfaces all around me forced me to to some trimming to fit with my block plane in one hand and the board in the other. My face frame was a bit tight and the brass faceplates for each niche were not fitting well inside the frame. The inner face needed to be trimmed ever so slightly but I’ll be damned if I was going to lay the finish ready Spanish Cedar down on the gritty concrete and plane the inner edge. For that matter without a stop to plane into I had nothing to oppose the force. Suddenly the beauty of the block plane became very apparent and I understood why most of the people I know who state this should be your first tool have some kind of carpentry background. You only need one hand to use a block plane. This frees up the other hand to hold the work. So I grabbed the stile and buried the end into my thigh thus steadying it and allow my other hand to run the block plane from end to end along the board. Thanks to the Williamsburg wheelwrights for this tip. My hand backed up the cut perfectly and could feel every slight change in balance of the block plane and adjust to counter it. I ended up with a perfect square board and a straight surface on the inner surface of my face frame without ever having to set the pieces down.
In hindsight this sensation of feeling the blade cut and adjusting the board to keep the blade engaged is very akin to the feeling you have when freehand sharpening. In fact I believe this is exact same thing thus reminding me that when you hone your sense of touch and hearing many things are possible in the wood shop without jigs, squares, and lighting.
Believe me I’m not ditching my workshop or my workbenches. Nor will I be selling off all my hand tools but a select few. I like tools as much as the next guy and I love my workbench. There is a reason why Joiners/Carpenters and Cabinetmakers were different trades. There is just some work that can’t be done without a good bench and work holding. But the lessons I’m learning by woodworking without are truly priceless. I doubt I will regain even a fraction of the knowledge held within an 18th century carpenter’s head, but I have a feeling 1% will serve me really well.
Your Turn
What stupid simple tricks and techniques do you use? Please share it because if we don’t get it out of your head then we just may lose that knowledge forever.
