The Long Awaited Sharpening Station Post!!!
 After many emails requesting a look at my new sharpening station with a discussion of the design and function, I finally got my butt in gear and finished the bottom cabinet doors. Now that it is done and loaded up with my sharpening gear goodness, I can’t believe I waited so long to build this. It is so nice having something set up all the time that I can turn to to freshen an edge. At the center of my sharpening system is my Tormek wet grinder. I use this to shape and rough out the bevels on all of my tools from turning gouges and adzes to plane and spokeshave blades. For the tools that need a higher degree of honing I then turn to water stones. I have two Shapton glass stones in 1000 and 8000 grit. I also have a DMT duosharp diamond stone with coarse and fine sides. For all of my plane irons and chisels I will go from the Tormek to the Shaptons to polish the bevel. Mostly though I go straight to the 8000 stone to rehone the edge during a project. Between projects I will assess and see if I need to go back to the Tormek to reestablish the bevel. Chisels I will do the same thing, with one major difference. If I am honing during work on a project I will use my WorkSharp because I can freehand the bevel angle easier using the angle port and I don’t have to get out my Veritas jig. The WorkSharp will allow me to polish to 6000 grit.
I admit I am a jig sharpener. I never learned to sharpen freehand and have gotten proficient enough with the jigs that I probably never will. In between projects though, I will use the Veritas jig on the Shaptons to get the mirror polish.
For my carving chisels I could use my Tormek, but there are some specialty jigs that I do not have yet and instead I freehand sharpen these tools on the WorkSharp using the slotted wheel. I also have some ceramic slip stones in various shapes to pull off the burr on the fluted side of the chisels. I use these ceramic stones to sharpen my chip carving knives too. I use either the strop wheel on the WorkSharp or my Butz strop to polish to a mirror finish on the carving chisels. Lately though I only use the Butz strop (for those who don’t know this is just leather on a wood board) when I am away from the shop like last August when I was carving in Maine on vacation. The power strop on the WorkSharp is just too slick to pass up.
As I mentioned in the last podcast, I stick to the Tormek for my turning tools. I do hone them on the leather strop wheel and mostly stick to that while turning. For instance, if I am turning pens, I mostly work with a roughing gouge so I set up the jig and keep it out so that in seconds I can freshen the edge and get back to work. Jigs allow for exact repeatability and instant results!
 So will all this paraphernalia you can imagine that I had to put a lot of thought into my sharpening station and how and why to store things. I took a look at the scrap I had in the shop and came across some 2×10 construction lumber left over from tearing out my old counter tops. So some resawing and planing later, I came up with this design:
A simple cabinet on wheels with a laminate top and ample overhang if I need to clamp anything in place. I added the bench vise for sharpening card scrapers or eventually saws once I can figure out how to do that (Woodworking in America!)
 Down below I store the Tormek (although it seldom leaves the counter top) and the WorkSharp along with a spray bottle for water stones, and a gallon jug of distilled water for the Tormek reservoir. I laid laminate on the bottom, partly to catch any water drops from the Tormek and partly because I had some left over so why not??? There is still plenty of room for growth in this lower cabinet and I went ahead and drilled shelf pin holes to allow the addition of adjustable shelves when the need arises.
 The four drawers are sorted into functions. The top left drawer is the most accessed since that is where my Tormek jigs are. I am left handed so why not put it on the strong side. There is also room for growth here as well if I decide to buy more jigs for carving tools. I know that all of the Jet sharpener jigs work on the Tormek too so I might look over there and see if something is useful. Some day I may put in dividers but for now it won’t hurt the jigs to be loose. In the small plastic container is the maintenance kit with wire brush, sharpie marker, and small first aid kit.
 On the top right is the next most sought after drawer with my stones, files, Veritas jig, burnisher, strops, and honing compound. I also have a small piece of a rubber yoga mat that I lay out on the top to put the stones on. This keeps them from moving around while I sharpen. One day I may build a small holder that I can put them in but for now this works fine. The beauty of the Shapton stones is that they are not stored in water, but rather sprayed before use. This prevents me having to keep a stone pond around for soaking. It can also get cold in the shop in the winter if I turn off the space heater and frozen stones in water will break.
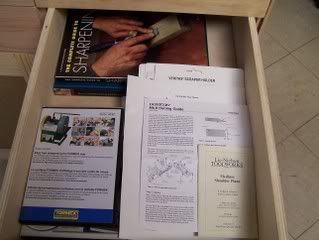 The bottom right drawer is my reference drawer. This is where I keep my Tormek DVD and instruction book. I also have the sharpening Bibles: The Complete Guide to Sharpening by Leonard Lee, and Taunton’s Sharpening by Thomas Lie-Nielsen. Finally all of the little pamphlets that come with your tools that have care and sharpening tips go in this drawer.
 The bottom left drawer is really overflow in the design. For now I have my extra glass wheels and sandpaper for my WorkSharp in there. I am probably going to build a base for the WorkSharp that will hold all the extras. This drawer suffices for now until more gear needs the space.
No sharpening station is complete without great lighting so I mounted a goose neck lamp on the top.
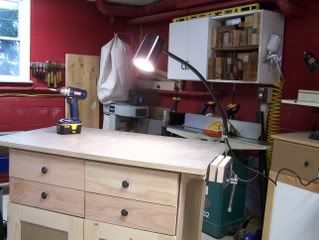
The lamp has an interchangeable base that mounts on a wall or a flat surface. I have the wall mount on the wall above my where my bench will go. You just lift the black clasp and the whole goose neck assembly lifts off to move to a new location. On the back side of the cabinet below the counter top is a power strip as well.
I always keep a roll of paper towels handy while sharpening as well as a few rags to wipe off surface and check scratch patterns. For now I will keep those in the bottom cabinet. Other features to note that went into the design are:
Height: designed to be tall enough so that my 6’4″ frame doesn’t have to stoop to examine edges. A happy coincidence it that I can sit on my shop stool and sharpen easily too.
Counter space: I wanted the top to be big enough to hold the Tormek and something else like the stone set up or WorkSharp. Since I use multiple tools to sharpen any one edge tool, this way I am not putting things away to make room. The top is 24″ deep and 40″ wide.
Mobility: There are 4 heavy duty locking swivel casters on the bottom to allow me to move the station wherever I need it.
 I couldn’t be happier with the design of this set up. It suits all of my substantial and varied needs to tackle any edge tool. As a happy side effect once I put all the tools away I have a very nice size assembly table too. I actually used it to assemble the bridle joints for the cabinet doors. In my mind you can’t ask more of a design than one that meets all your planned needs, has room for future, unknown needs, and accidentally services ancillary needs.
OK, now you have seen it. Hit me with your questions about why or how I did something. Let me know if you have sharpening questions. I am not the Zen sharpening master, but I have tackled most edges and now am equipped to tackle them in style.
