A Hand Sawing Exercise, Roubo Style
With my Roubo benchtop close to finished, it was time I cut the ends flush and square. The top is heavier than I can lift so this is definately one of those “take the tool to the wood” moments. My circular saw is not up to this task no matter high light a cut I take, and my jigsaw doesn’t have the length of travel necessary to get through this either. My only option remaining is to do it by hand. What better opportunity to practice my hand sawing technique.
The left side of the bench will have the Benchcrafted vise installed there and I need it to be perfectly flat and square since an endcap will be mortised to fit there. I used my bowsaw to take the end flush and then set up a fence to guide my router and a straight bit to get the face perfectly square. I’ll use this same set up to cut the tongue that will mate to the mortise in the end cap.

For the right hand side of the bench it is a different story. Nothing will be mounted here and it doesn’t have to be perfect so this is where the sawing exercise comes into play. A few episodes of my podcast ago, I mentioned that I had won a Disston D23 filed crosscut. I have played around with it on smaller boards but have had problems keeping my cut plumb to the face. Using my framing square, I drew several lines across the end of the bench to use as a guide for practice cuts. My finished benchtop will be 8 feet long but I have 4 inches extra in the top right now. If my shop would accomodate a longer bench I would keep it that way, but I need it to fit under the window and any longer than 8 feet will not work. I used a saddle square to extend the lines down the sides and a little ways across the bottom too.
I started the cut and focused on keeping to the vertical line by sawing almost vertically into the top.

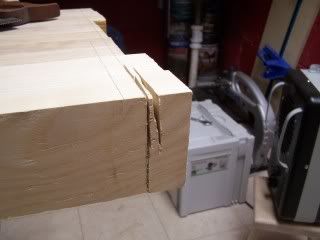
Here you can see the vertical kerf. The angled kerf to the side is an earlier attempt where I was focused too much on the horizontal line acrros the top and wandered off square.
Once I had established the kerf to be plumb I leaned the saw back and started tracking along the horizontal line on the top.

I found that my cut started to wander off the line so I laid the saw down further to correct the line.

This did the trick and I was back in business. Lots of sweat later I had finished the cut across the 20″ wide top and it was time to inspect my work.

I only wandered from the horizontal line by a little at the end of the cut.

But I discovered that I had fallen off my line in the vertical plane. More than likely this was while I had laid the saw down to correct my line horizontally. Here you can see the line of the original vertical kerf and then a tiny ledge where the cut wandered off at an angle. Unfortunately the rest of the cut is in this out of square plane.

Here’s a look at the other side of the cut clearly showing where I have deviated from my line.

Fortunately, the cut went out of square on the friendly side of the line and I can true it up using a spoke shave and my low angle Jack plane. Since I seem to have the disposition to cut off the square vertical plane, I figured I should get some practice truing up a face using a plane. Here you can see the start of a planed face.

This is a simple operation normally when dealing with furniture pieces as you can put the stock on a shooting board and have it square in no time. Not so in dealing with a piece this big. I would need one heck of a shooting board! I have some work ahead of me, better get back to it!
