Tight Timeline, Low Cost Delivery: Stickley Tabouret # 603
I received a “rush order” request from my wife last Thursday for a small end table to go into her voice studio where she conducts all of her private lessons. The little makeshift table she was using literally fell apart when a student leaned on it by accident. I think it was something that was floating around the school already and she grabbed it because it was there. It does nothing but provide a place to keep a box of tissues, a plant, and space for students to place things during their lessons. Since it collapsed on Wednesday, she has had more than a few student comment, “hey where is that little table, I used to set my books there?” or, “where is that little table with the tissues on it?”
It’s funny how a seemingly insignificant piece of furniture can play such a major role in the function of a room. You may not even notice it (unless you’re a woodworker) until it is gone and you suddenly have no place to set your keys or reach for a tissue. So by Thursday afternoon it was readily apparent that she was going to need something to replace the table, and preferably something that wouldn’t fall apart when a student leans on it.
Enter the fabulously talented woodworking husband of said teacher! My marching orders were to produce a small table that would sit in a corner and be around 25″ high. No drawer, no shelf, just a simple, square table top. It needed to be built and delivered by Monday ideally and built using only scrap laying about the shop. The finish would be black lacquer to match the piano already in the studio.
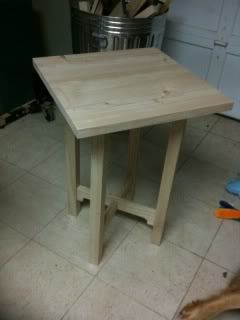
My time constraints immediately eliminated the visions of cabriole legs and Queen Anne cyma curved aprons. I am a notoriously slow woodworker so I needed to scale back my design. I decided upon something from the Stickley catalog because the straight forward lines and sturdy construction would fit the bill both aesthetically and functionally. The Stickley number 603 Tabouret would fit the bill nicely.

The size and stock requirements would allow me to build it with only the scrap laying about and it would fit into a corner well. I liked the crossed stretcher and uniform design that allows you to place it any which way and it will always be facing front. My wife is not keen on the round top and with some quick mocking up in SketchUp I was able to render this same design with a square top. That got the seal of approval and I was off to the races.
I did an inventory of my stock in the shop and knowing that this piece would be painted I wasn’t ready to “sacrifice” my good hardwood. I came up with a piece of 2×12 construction lumber and a big hunk (5×4.5×36) of Kiri that I got for a song many months ago. For long time readers this is the same piece that I used to make my Tansu box in June of 2009. Knowing what raw material I had on hand it was time to consider where construction compromises needed to be made. Since I was only using scrap I would need to do some resawing and panel glue ups to get the dimensions I needed. I hoped to save the time added in milling by attaching the lower stretcher with an integral tenon instead of the through tenon that Stickley so loved. Not having to fuss over a clean exit of the tenon and then clean up/chamfering the exposed end would cut an hour out of the build easy.
I considered attaching the top stretchers with pocket hole screws but since I was building the piece out of softwood I was not convinced that the pocket screws would hold up over the years. Instead I stuck with the traditional half blind dovetails into the top of the leg posts. No one will see these dovetails so they don’t have to be show quality and using softwood allows for some compression space when fitting the joint. In reality these joints came out really pretty and it was almost a shame to hide them under the top.
The top was glued up from two pieces in probably one of the cleanest panel glue ups I have ever done so there was very little surfacing to be done once it came out of the clamps. It is attached through elongated screw holes from the top stretchers to compensate for seasonal movement.
From rough lumber to a sanded piece, I only spent about 5 hours. I kept to my promise of table saw and power jointer abstinence as well, but don’t think that really added any build time since I roughed the pieces out on the bandsaw while cutting down that big hunk of Kiri. I usually do my joinery by hand anyway.
This was a whirlwind build from concept to finish and it taught me a lot about how I work and what decisions I make along the way. What compromises do you make in a design due to time and money constraints? How do you deliver a quality product on a tight delivery schedule while not sacrificing your style? I don’t have a picture of the finished piece yet because by the time the finish was applied it was dark outside and I really can’t get a black lacquered piece to show up well in my shop lighting. I’ll take some pics when it reaches it’s final home and post them.
