Step 1 of Assembling Roubo Legs
I do believe I have finished all the rough milling for my Roubo bench. I have lost count of the number of times I have emptied the dust collector, but beyond some trimming here and there, all of my parts are flat and in rough dimensions.
Of course with a bench this big the problem for the small shop woodworker suddenly becomes, “where do I put all of these parts?” I have 14 boards for the top, 8 boards for the stretchers, 16 boards for the legs, etc, etc. I thought the best way to tackle my space issue was to start laminating some of these parts together to make some sense of it all. Wouldn’t 4 legs be better than 16 parts?
In Chris Schwarz’s Workbenches book, he laminates his legs so that he doesn’t have to cut any tenons. I like this idea and will mostly likely follow his example. However getting four parts perfectly aligned sounds like too many moving parts for a good glue up so I decided to go ahead and laminate the two inner boards of the legs together to form the tenon. Once this is dry I will sandwich these tenons between two other boards forming the 5″ square legs.
So first to match grain patterns and direction and mark the boards as usual with a cabinet maker’s triangle. Then it’s time to start rolling on the glue.

Now it’s time to pull out all the little clamps I have in the shop.
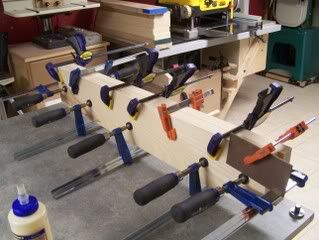
4 leg tenons glued up and now there are fewer parts floating around the shop

Once these are dry I will trim the ends to length as well as to width. I left each board long and wide so that I would have the ability to flush all four sides once dry. I’ll be doing that tonight and then moving on to the final “sandwich” glue up.
As I was matching the grain and such for the tenon parts I did notice that one of my boards had a check on the end. This had always been there and I initially sized the board so that I would cut that check off. However it was obvious that this check was creeping down the board as it had now intruded 1″ beyond my cut line.
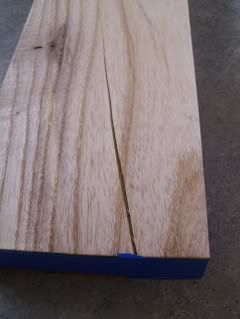
I needed to stop any further movement on this so like any loyal Wood Whisperer fan, I pulled out the blue tape and epoxy and went to work. First I dam up the opposite side so that the epoxy won’t drip through and glue the leg part to my assembly table.

Next I mix the epoxy and glob it on. This brand of epoxy is actually a lot thicker than I normally like to use but I was all out of the good stuff. (I just finished a custom built graphite fly rod and used all the epoxy for the guides. Another topic for another day) So with this epoxy being thicker I worked it into the crack much like you work grout in between tiles in a bathroom.
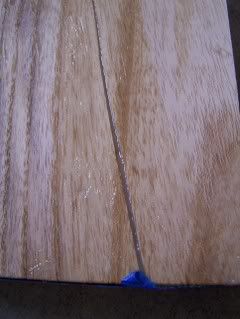
I did add a little sawdust to this to tint it but I am not really concerned about hiding this epoxy since most of the crack will be cut off when I trim the board to length. Plus, this is a workbench after all.
